

Yaesu releases WiRES-X 2.010
On May 1st, 2026, Yaesu released an update to the new version of WiRES-X. This latest version 2.010 fixes some of the issues initially experienced by those, especially large WiRES-X rooms, from the first iteration of the program. Specifically, this version addresses the following issues:
- Resolved an issue where Downlink audio could experience dropouts when multiple nodes in a Room initiated Uplink transmission at the same time
- Fixed a bug where the v1.5 node would disconnect if there was an Uplink from the FTX-1 node
- Fixed an issue where QSL images were not transmitted correctly upon connection
- Fixed a display corruption issue in the popup list of connected Nodes when a ver 1.5XX node connected to a Room with 129 or more connections.
Yaesu puts out in their “Yaesu, the Radio, Show Podcast,” which I have links to at the bottom of this page.
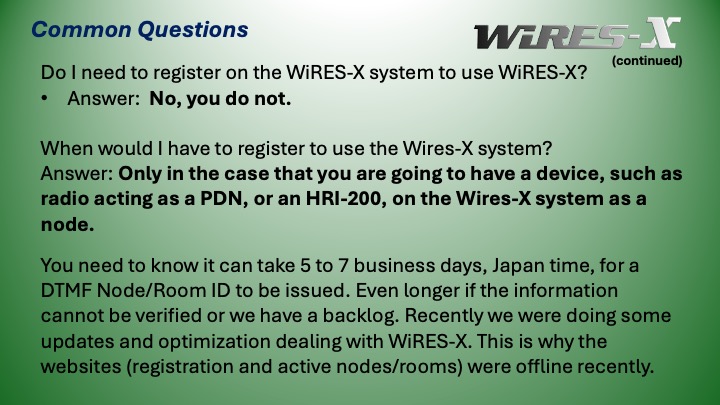
Remember, you ONLY need to register if you’re going to use that device as a PDN or an HRI-200. If you are NOT going to use the radio standalone from the repeaters, then you DO NOT NEED to register to use the WiRES-X system. If you do decide to register a device, you will want to watch this video by John Kruk at Yaesu by clicking here.
I have added more information on using the Yaesu FTM-7250DR on WiRES-X. During my presentation at the Lake Wales Radio Amateurs meeting on Monday, March 13, 2025, there were a couple of people there with this radio with questions. Click here to watch that meeting video. On 04/20/25 I have added an FTM-7250 cheat sheet I made for someone who I programmed up a radio for recently (click here for that cheat sheet or the link in the FTM-7250 section).
Also, there is now a new FT-70D cheat sheet link in the FT-70D section.
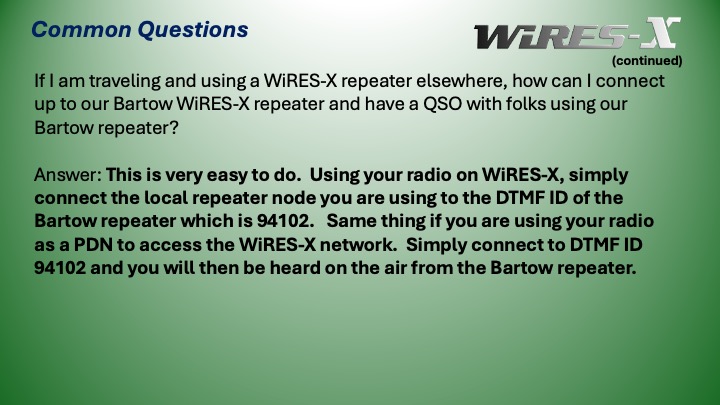
For the past year and a half or so, we’ve been using the Bartow 145.27/- repeater in Fusion mode only. Without WiRES-X, the repeater has operated like any other analog FM repeater we have used. It wasn’t connected to the Internet during that time, but as of 01/27/2025, the Bartow Fusion repeater has evolved into the Bartow WiRES-X repeater.
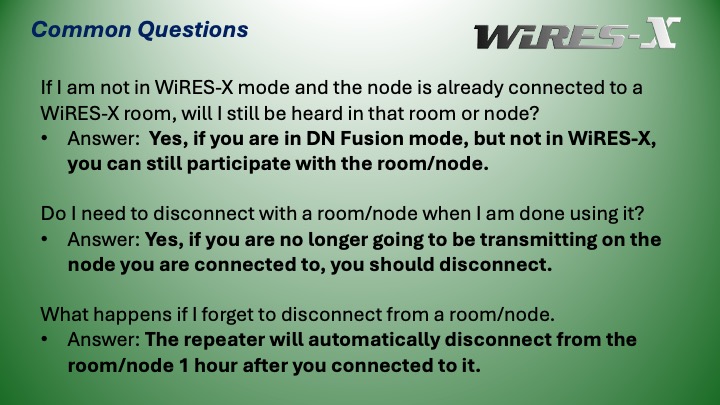
The Bartow repeater is set to be Fusion only, and no FM. You will want to be in DN (Digital Narrow) mode in order to use and be heard in the WiRES-X rooms when it is connected. If someone already has the repeater connected to a WiRES-X room, you can communicate with folks in the room without pressing the WiRES-X button and are in DN mode.
Over the course of the next few days, I’ll be adding links to videos, as well as command lists, for the radios I believe folks are using in our community.
Before we get into the individual radios and their use on Wires-X, one document I think you will find interesting and helpful is the WiRES-X Bible by WB7OEV, K9EQ, and HamOperator.com. It covers a variety of radios and has screen examples. So, if the videos or information below don’t help you, I suggest you visit the WiRES-X bible at https://tinyurl.com/wiresxbible.
There is some etiquette we can follow when we are using the WiRES-X repeater. As we get started, folks will be learning, and that’s great, so experiment and learn, and don’t worry, you can’t hurt anything. Be sure to ask questions if you have them. There will be plenty of people monitoring the repeater early on so put your call out there and I’m sure your question will get answered.
Etiquette when using a WiRES-X repeater
Some of the examples of good etiquette, used by the XRX Amateur Radio Club in New York are:
- If the repeater is connected to another room or node, DO NOT CHANGE TO ANOTHER ROOM. It is where it is for a reason. Somebody is using it.
- If connecting to another room, make contacts as desired, and DISCONNECT from the room when done.
- Do not tie up the repeater so you can just listen to other rooms/repeaters in other areas. If you just want to listen, use/get a radio that supports PDN mode. Or, most popular rooms and repeaters have broadcastify support, you can listen all you want there.
- The WiRES-X node is usually on a timeout timer, so don’t be surprised if it disconnects after some preset time (in our case, one hour).
- If you are connected to another room, but not involved in a QSO, and local FM users start using the repeater, disconnect from any rooms so as to not create a mode conflict on the repeater.
Guidelines for WiRES-X Use
- Press the WiRES-X button on your radio to connect to the node.
- Use the search features of your radio to find a room or node to connect to.
- Due to latency on the internet, is is good practice to wait a second or two after pressing the PTT button before speaking, and to hold the PTT for a second or two after finished speaking.
- Also not a bad idea to say “over” or similar when done speaking.
- When done with QSO – disconnect from the node or room. Varies by radio, but press the * button on an FTM-400DR microphone to disconnect the node.
Noteworthy nets on WiRES-X
|
Day
|
Time
|
WiRES-X Room |
Net Name
|
|---|---|---|---|
|
Thursday
|
20:00
|
81609 –Florida–WCF–
|
East Pasco Amateur Radio Society
EPARS C4FM Fusion Net |
|
Saturday
|
21:00
|
21080 America-Link
|
International WiRES-X Fusion Net
|
|
Monday
|
19:00
|
28054 America’s Kansas City Wide
|
Parks on the Air (POTA) Net
|
|
|
|
Links to check active Nodes and Rooms
- Click here to check ACTIVE NODE ID LIST
- Click here to check ACTIVE ROOM ID LIST
- Click here to view the Wires-X ID List
So, with the business part of WiRES-X out of the way, lets look at some radios and how they work with WiRES-X:
Yaesu FT-70
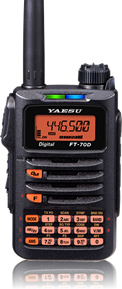 The Yaesu FT-70DR can do WiRES-X. It doesn’t have a dedicated set of WiRES-X buttons like some other Yaesu handhelds have like the FT2DR, FT3DR, or the popular FT5DR, but it CAN do WiRES-X nonetheless.
Below you will find a list of commands you can use on the FT-70DR to use WiRES-X, followed by a video you may want to check out on using these commands.
WiRES-X Shortcut Keys – Take note that the outside keys are the primary keys:
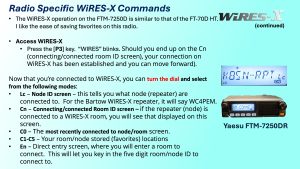
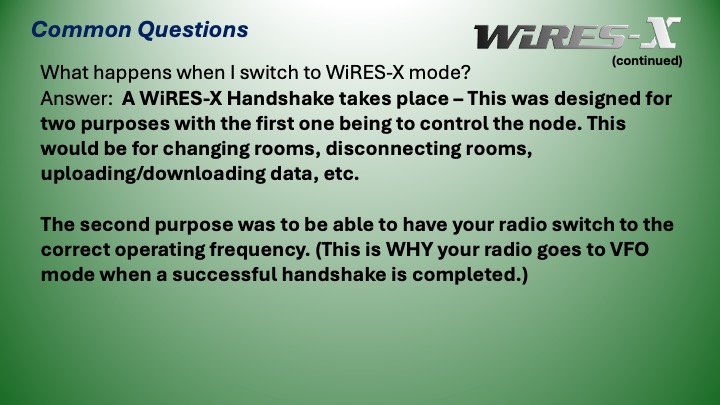
To enter WiRES-X mode, Press the <F> key, release, and then press the <AMS> key. Your radio will communicate with the repeater and you’ll be ready to send WiRES-X commands. (Note: If you try and enter WiRES-X mode and it keeps flashing WIRES, you may not have a good signal connection with the repeater. Should you end up on the Cn (connecting/connected room ID screen), you connection on WiRES-X has been established and you can move forward).
Now that you’re connected to WiRES-X, you can turn the dial and select from the following modes:
Lc – Node ID screen – this tells you what node (repeater) are connected to. For the Bartow WiRES-X repeater, it will say WC4PEM.
Cn – Connecting/connected Room ID screen – if the repeater (node) is connected to a WiRES-X room, you will see that displayed on this screen.
C0 – The most recently connected to node/room screen.
C1-C5 – Your room/node stored (favorites) locations
En – Direct entry screen, where you will enter a room to connect. This will let you key in the five digit room/node ID to connect to.
CONNECT to a stored room (favorite) – Turn the Dial to C1-C5 where the room is stored, then press the <AMS> key, and you will be connected to the room.
CONNECT to a non-stored room, simply turn the dial to the En position, type in the room number, then press the <AMS> key.
To STORE a number in your registered/stored list (favorite) , while you are connected to the room, simple press and HOLD down the number of the location you would like the room stored to.
To DISCONNECT from a room, press and HOLD down the <BAND> Key.
DONE with WiRES-X? Simply press and HOLD down the <MODE> key and you will be restored to normal radio operation.
Here is a link to the FT-70DR cheat sheet, CLICK HERE, (thanks to the folks at N8UKF.com, hamfusion.com)
FT1DR/FT1XDR
First things first, Yaesu does make a WiRES-X instruction manual for the Yaesu FT1DR. You can click here to download/view the Yaesu FT1DR WiRES-X instruction manual.
If you have a Yaesu FT1XDR. you can click here to download the manual for the FT1XDR.

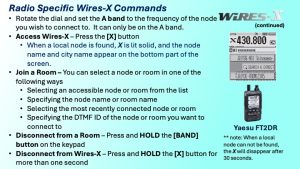
FT2DR
First things first, Yaesu does make a WiRES-X instruction manual for the Yaesu FT2DR. You can click here to download/view the Yaesu FT2DR WiRES-X Instruction Manual.
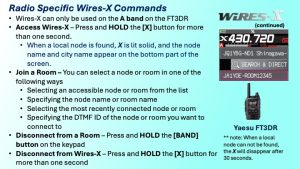
FT3DR
First things first, Yaesu does make a WiRES-X instruction manual for the Yaesu FT3DR. You can click here to download/view the Yaesu FT3DR WiRES-X Instruction Manual.
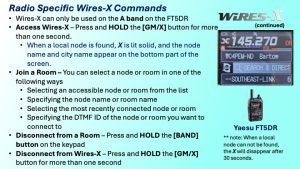
FT5DR
First things first, Yaesu does make a WiRES-X instruction manual for the Yaesu FT5DR. You can click here to download/view the Yaesu FT5DR WiRES-X Instruction Manual.
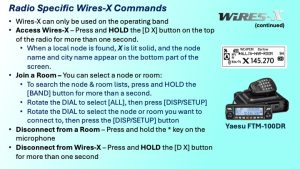
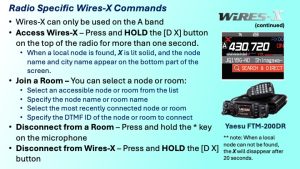
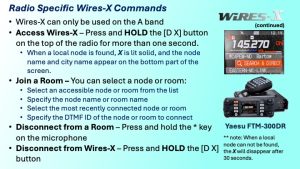
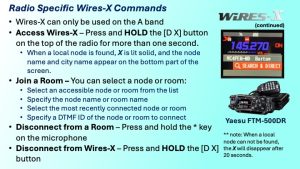
To enter WiRES-X mode, Press and HOLD the [GM/X] button for more than one second
To connect to a room using it’s DTMF room number:
- Press the SEARCH & DIRECT button
- Touch the ID button on the upper left hand corner of the screen (a # will appear)
- Enter the five digit DTMF room number
- Touch the [ENT] button. At this point you should connect to the room or Gateway if it is available
To connect to a room by searching for it’s name (or partial name):
- Press the SEARCH & DIRECT button
- Enter all or part of the room name
- Touch the [ENT] button
- If the first part of the room you would like to connect to is found it will be listed
- Touch the name of the node or room you want to connect with and the connection will begin
To connect to a node or room you most recently connected to:
- If you have recently connected to a room or node, it will be displayed at the bottom of the screen (flashing).
- Touch the flashing room or node that is flashing on the screen and you will be connected to that recently connected node/room
The FTM-500 also has the ability to store your favorite nodes and rooms so that you don’t have to maintain a written list of your favorite places or room numbers. It can store up to 20 favorites into each of the five categories in the radio.
Registering category names:
- Press and HOLD the [F menu] key
- Touch [WiRES-X]
- Touch the [3 – Edit Category TAG]
- Rotate the dial to select the one of the categories [C1-C5] and then press the [F menu] key
- Enter the category name
- Press the [BACK] key when done and you will be returned to the list
- Press the [PTT] to set the category name and return the screen to the frequency display screen
To store a connected node or room into a category:
- Touch the node or room you want to connect to on the bottom of the screen
- When taken to the screen for the room that has News and other options, click the [ADD] button button and the category list will be displayed
- Touch the desired category and the name of the node or room you are currently connected to will be stored in that category
- Press the [BACK] key to return the screen to the menu list
Connecting to registered nodes or rooms you stored in a category:
- When in WiRES-X touch the SEARCH & DIRECT button
- Touch one of the C1-C5 categories
- Touch the node or room you want to connect to and the connection will begin. If you have a lot of rooms or nodes stored in a category, rotate the dial to move down the list and highlight the room you want. You can press the PTT to enable the connection to the room
FTM-7250
First things first, check out the Yaesu manual starting on page 33 for operating on WiRES-X on the FTM-7250DR. Click here to download/view the manual for the Yaesu FTM-7250DR. Or, for cheat sheet that I made for someone after programming their 7250, click here.

FTM-100
First things first, Yaesu does make a WiRES-X instruction manual for the Yaes FTM-100. You can click here to download/view the Yaesu FTM-100 WiRES-X Instruction Manual
FTM-200
First things first, Yaesu does make a WiRES-X instruction manual for the Yaesu FTM-200. You can click here to download/view the Yaesu FTM-200 WiRES-X Instruction Manual.
FTM-300
First things first, Yaesu does make a WiRES-X instruction manual for the Yaesu FTM-300. You can click here to download/view the Yaesu FTM-300 WiRES-X Instruction Manual.
FTM-400
First things first, Yaesu does make a WiRES-X instruction manual for the Yaesu FTM-400. You can click here to download/view the Yaesu FTM-400 WiRES-X Instruction Manual.

FTM-500/FTM-510
First things first, Yaesu does make a WiRES-X instruction manual for the Yaesu FTM-500. You can click here to download/view the Yaesu FTM-500 WiRES-X Instruction Manual.
Beyond using WiRES-X on a Repeater
So you’ve been using your local WiRES-X repeater and enjoy using the WiRES-X rooms. However, you want to use and monitor them more extensively and don’t want to tie up the repeater for long periods of time. Remember, best rule of thumb is, “the needs of the many, outweigh the needs of the few or the one.”
If your radio is capable of being a node (PDN), then you’re half way there to getting into WiRES-X rooms on your own, using your own computer, with the WiRES-X software.
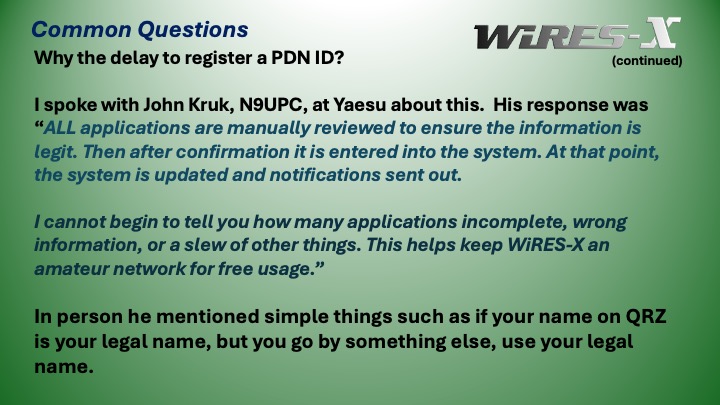
Up until this point, you didn’t have to register on the WiRES-X system because you’ve been using a repeater to get into the WiRES-X rooms. However, if you have a radio, or a Yaesu HRI-200, and want to setup your own node to access WiRES-X, then you’ll need to register that device on WiRES-X. The following short video by John Kruk from Yaesu explains this plainly. (click here to watch the video)
Using your radio that is PDN capable is a great way to use the WiRES-X rooms without tying up the repeater for extended periods of time.
What do you need to do to use your radio as a PDN? Follow these steps to first, see if you can use your radio as a PDN, and then obtain the cables and software necessary.
Portable Digital Node operation requires a compatible transceiver (FT5DR/DE, FT3DR/DE, FT2DR/DE, FTM500DR/DE, FTM400XDR/XDE/DR/DE. FTM-300DR/DE, FTM-200DR/DE, or FTM-100DR/DE and a personal computer (Windows 8.1 or later) with a USB port.
Step 1: User registration (acquire an ID number)
- During the registration process you’ll need to know your radios ID. Here is a guide to help you find your radio’s ID:
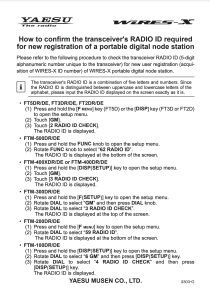
*** Special note from Yaesu regarding the time it takes to register your radio or HRI-200 on the Wires-X system. It can take 5 to 7 business days, Japan time, for a DTMF Node/Room ID to be issued. Even longer if the information cannot be verified or we have a backlog. Recently Yaesu was doing some updates and optimization dealing with WiRES-X and their website (registration and active nodes/rooms) were offline due to the backlog of registrations.
Step 2: Install Wires-X Software to the PC that you can download from the Yaesu Wires-X Web site
Step 3: Install the connection cable USB driver for your respective radio
Step 4: Update the firmware of your transceiver
Step 5: Connect the transceiver to the PC
Depending on the transceiver used, one or more of the following connection cables is required:
- FT5DR/DE, FT3DR/DE, or FT2DR/DE
- SCU-57 or SCU-39 Wires-X Connection Cable Kit
- SCU-57 or SCU-39 includes the SCU-55 or SCU-19, CT-44, and two audio cables
- SCU-57 or SCU-39 Wires-X Connection Cable Kit
- FTM500DR/DE, FTM-400XDR/XDE/DR/DE or FTM100-DR/DE
- When connecting with the digital node station in the portable digital node mode
- SCU-56 or SCU-20 PC Connection Cable
- When communicating with a digital node station or an analog node station in the portable HRI mode via the Internet
- SCU-58 or SCU-40 Wires-X Connection Cable Kit
- (The SCU-58 or SCU-40 includes the SCU-56 or SCU-20 and an audio cable)
- SCU-58 or SCU-40 Wires-X Connection Cable Kit
- When connecting with the digital node station in the portable digital node mode
- FTM-300DR/DE or FTM-200DR/DE
- SCU-58 or SCU-40 Wires-X Connection Cable Kit
- (The SCU-58 or SCU-40 includes the SCU-56 or SCU-20 and an audio cable)
- SCU-58 or SCU-40 Wires-X Connection Cable Kit
***Note: If you’re just going to use your radio on a Wires-X repeater, and not setup your own node, then no Wires-X registration is necessary.
Common Questions
Yaesu, the Radio, Show Podcast
- On this episode of the Yaesu USA – PODCAST John discusses WiRES-X version 2.01, why you should upgrade, advantages to using v2.01, and room compatibility between versions. You can watch the video version of this PODCAST on our YouTube Channel – Yaesu USA Official.
- In this episode of the Yaesu USA: PODCAST we discuss the events from Hamvention 2026. This included the Yaesu System Fusion (Hands On) Customer Class, WiRES-X Seminar, and DR-3X announcement.
- On this special broadcast join John as he announces and highlights some of the features of the DR-3X which is part of the Yaesu System Fusion 3 generation. Please visit our YouTube Channel – Yaesu USA Official for the video version of the PODCAST.
- On this episode of the podcast join John the discusses the upcoming Yaesu system Fusion Customer Class and Fusion Forum topics at Hamvention.
- On this episode of the podcast join John the discusses the FTX-1 and WiRES-X functionality. Also, check out the Yaesu website about the Instant Savings now through May 30th, 2026, on the FTX-1 series https://yaesu.com/promotions.aspx
- On this episode of the podcast join John the discusses the origins of the FTX-1 series and the difference between the FIELD and OPTIMA. Also, check out the Yaesu website about the Instant Savings now through May 30th, 2026, on the FTX-1 series https://yaesu.com/promotions.aspx
- On this episode of the podcast join John as he answers some questions about WiRES-X v2.0.
- On this episode of the Yaesu The Radio Show – PODCAST we discuss and clear up information on WiRES-X version 2.0
- On this episode of the Yaesu The Radio Show – PODCAST join John as he talks about the routing/ISP and port forwarding needed for Yaesu items (i.e. WiRES-X, IMRS, SCU LAN10).
- On this episode of the Yaesu The Radio Show – PODCAST join John as he talks about the data interfaces on current Yaesu models.
- On this episode of the Yaesu The Radio Show the social media asks to provide some answers to questions and discuss some common things about our social media avenues. As a recap for contacting Yaesu USA – Contact Us page on Yaesu.com; Parts Department: yaesuparts@yaesu-us.com ; Customer Service for Repairs: customerservice@yaesu-us.com ; Technical Support for […]
- On this episode of the Yaesu The Radio Show – PODCAST John recaps Hamcation 2026 and the Yaesu system Fusion (Hands On) Class held the day before.
- On this episode of the Yaesu The Radio Show – PODCAST John talks about why to use Digital Voice (in particular Yaesu System Fusion). Join the Yaesu USA staff at Hamcation 2026 next week in Orlando, FL.
- Welcome to the new season of the Yaesu podcast and for our first podcast we discuss the upcoming Yaesu System Fusion (Hands On) Class at Hamcation. Thank you for Hamcation for being a sponsor of this class allowing the class to be offered in conjunction with the event. Visit the Hamcation website at – https://www.hamcation.com/
- On this weeks episode John talks about the different manuals for radios and where to start to learn a radio with the manual.
- On this weeks episode John discusses what DP-ID is and what is it used for with Yaesu System Fusion.
- On this weeks episode John discusses some questions that came up from Episode 27 with DG-ID.
- On this weeks episode John discusses what DG-ID is and what is it used for with Yaesu System Fusion.
- On this weeks episode John discusses was WiRES-X down last Monday with the DNS error and other errors that make people think it might be down.
- On this weeks episode John discusses some of the common questions Yaesu receives dealing with battery charging, displays, and more.